Editor’s Note: This is the third in my three part series “Saving Your Sanity In the Edit Bay.” Click here to read part 1 about editing in time blocks, and click here to read part 2 about contextual editing.

Zack Arnold
How to Build Your Post-Production Workflow With Trello
I’ll never forget the first time I read “Behind The Seen” about Walter Murch’s journey editing Cold Mountain using Final Cut Pro (I fondly refer to this book as “Porn for editors”). One of the most profound things I learned from this book was his intricate system of creating colored index cards and putting them up on a wall to help him organize the structure of complex films. I was mesmerized by this concept – it was like Tetris mixed with screenwriting and film editing…my own personal version of heaven.
(BONUS: Click here to listen to my podcast with Walter Murch)
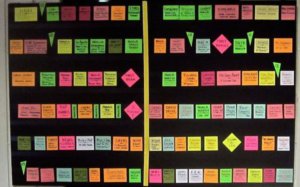
Pictured is Walter Murch’s board for the documentary film “Particle Theory.”
The concept of mapping out your story with index cards on a wall was not revolutionary…but it was revolutionary to me.
From that moment on I began creating walls of index cards for all of the indie features I was editing. Working with my assistant (if I was lucky enough to have an assistant) we would spend days constructing these boards, picking out the right colors for the different storylines, deciding what should be written on them, and then putting the cards on a giant magnetic white board so we could move it from room to room.
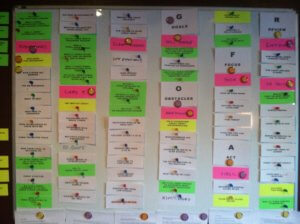
Pictured: The board I used to write my documentary film GO FAR: The Christopher Rush Story
After doing this for several feature films I became increasingly frustrated at how laborious this process was. It literally took days to map everything out, and moreover if you had to make changes, it definitely wasn’t easy (or fast). The worst part was the fact that there was no “Save” function. The only “archival” option was taking pictures, and even then you had to manually reset your entire board if you had to revert to an older version of your story.
My breaking point was when I started working in television. When you only have two weeks to deliver your editor’s cut, you can’t spend 2-3 days with your assistant printing out index cards and sticking them to a wall. I attempted this process once and quickly gave up; there just wasn’t enough time.
I thought to myself, “There has to be a better way.”
Then one day Kanen Flowers (CEO of That Studio) introduced me to the magic of Trello, and my life changed forever.
WHAT IS TRELLO?
Trello is FREE web-based project management software that is essentially the digital version of a giant white board on the wall with index cards. But now imagine the index cards on that whiteboard are accessible to you and all of your team members worldwide. Everyone can not only view those cards but also they can communicate directly on those cards with you and all of your other team members, attach documents and share media, link to cloud-based storage platforms like Dropbox and Google Drive, assign due dates, and perform a wide variety of other functions and tasks.
The coolest thing about Trello is that you can start using it in less than 10 minutes. But it takes years to master.
I began my journey learning Trello several years ago, and at the time I just wanted to figure out a digital version of putting index cards on the wall (which I now call my ‘Structure Maps’). But the deeper I dug into the vast array of features that Trello has to offer, I began to realize that Trello could potentially save me a tremendous amount of time and help me realize my other wild ambition: Going 100% paperless in post.
Here are just a few of the many things I’m able to do with my Trello workflow:
- Organize my episodes into ‘Structure Maps’ (then save them and duplicate them)
- Digitally organize all of my dailies paperwork by day and individual scene (and eliminate the giant bookcase filled with 4” binders)
- Organize the notes I take when watching raw footage
- Keep track of all my calendars, shooting schedules, and delivery dates
- Keep track of every single creative and technical note that I receive from directors, producers, and executives all in a single place
- Organize my editing contexts
- Eliminate project-related emails (with the help of Slack)
- Track my editorial progress and instantly filter out scenes I don’t need to focus on
- Create editorial calendars I can sync with other calendar apps
GETTING STARTED
I would like to clarify before moving forwards that this is just my own workflow, this is not THE workflow. The brilliance of Trello is that it is infinitely customizable. Also keep in mind the workflow outlined below is mainly for scripted television, but it can easily be adapted for feature films, unscripted work such as reality and documentary, and even for delivering a high volume of videos such as commercials or YouTube videos. If you come up with different or better ways to do the exact same things, fantastic! All I am laying out is the system I built over the last 2 years (with the help of my assistant Natalie Boschan).
[As a side note, I must recognize my “Trello partner-in-crime” Natalie because there would be no Trello post-production workflow if not for her putting up with my incessant experimentation and tweaking over the last 2 years. More importantly, some of the most brilliant ideas in this workflow belong to her, not me.]
If at any point from here forwards you are thinking, “Wow, that sounds cool, but…how do I actually do that?” then please check out my brand new course on Lynda.com:
As tempting as it might be to start creating boards, lists, and cards right away, your first step is to gather all of your tools and have a system for using them together.
Here are the 2 main tools I use in conjunction with Trello in my post-production workflow:
- Slack (for team communication beyond 3-4 people)
- Google Drive (for organizing all of my paperwork and documents)
And a bonus tool if you want to get more advanced:
- Zapier (for creating workflow automations and notifications)
Once you have your tools ready to go, the next step is creating your first board.
CREATING YOUR ‘MAIN BOARD’
Throughout our experimentation process, Natalie and I went back and forth about how many boards we needed for an episode versus an entire season. After much trial and error (and lots of messy, disorganized boards), the solution we came up with was to have one MAIN BOARD per episode of a show, and one STRUCTURE MAP per episode (with duplicates that we archived when we needed to access earlier iterations).
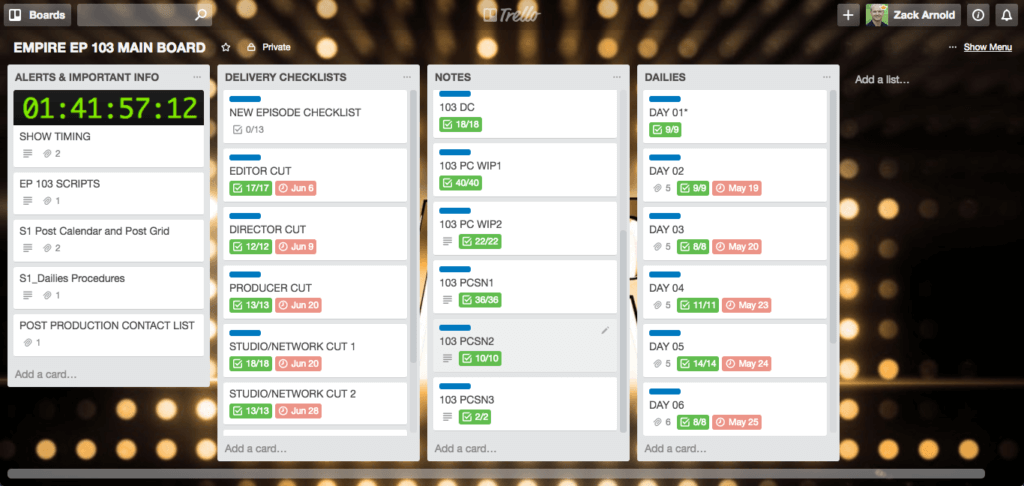
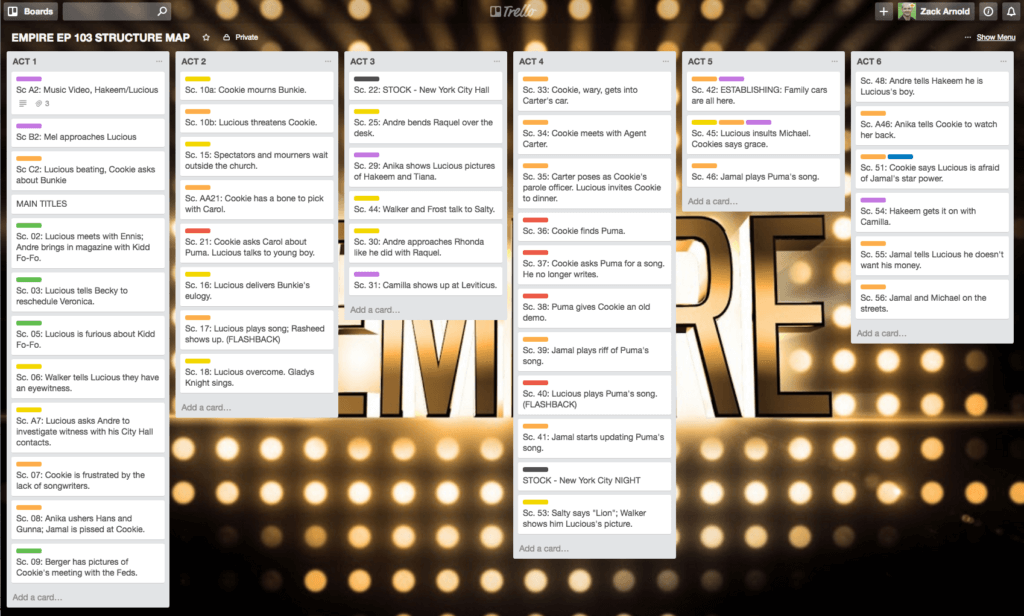
Pictured above is the MAIN BOARD for Empire Episode 103
Once you have created your first MAIN BOARD, these are the five main lists to create:
- Your ‘General Info, Workflow, & Docs’ List
This list is used to collect all general documents, project information, calendars, timing sheets, etc. This is also the place to create cards that have your delivery specs (e.g. ‘Sound Delivery Specs,’ ‘Picture Delivery Specs,’ etc). I also consider this list my “Inbox” for collecting and sorting all outside emails that I forward to this board.
- Your ‘Delivery Checklists’ List
This list is used for all of your workflow checklists. For each stage of a cut we map out all of the repeatable actions in our workflow and check off each step as we complete it. This gives our entire team a real-time update of where we are in the process (BONUS: To learn more about the power of creating checklists, read The Checklist Manifesto).
- Your ‘Raw Footage’ or ‘Dailies’ List
This list is used to organize cards for each shooting day. Each card then has all of the pertinent paperwork attached to it for that shooting day, repeatable tasks in checklists for processing dailies, and we also assign dates to this to create a visual calendar representation of the shooting schedule (so we can plan our workload accordingly). As a bonus, you can also link all of your structure map scene cards to a checklist in your dailies cards to track your progress.
- Your ‘Notes’ List
This list is used to collect every single note and revision from every source throughout the creative process. At any given moment if someone asks me, “Why was this change made?” I can quickly search through this one list and explain at what stage in the process this note was given, by whom, and even in what format (i.e. via email, phone, in the room, etc).
- Your ‘Additional Elements’ List
This list is where we store miscellaneous information about other elements, and this can easily become multiple lists if you need to split out between visual effects, music, stock footage, etc. And if for example you have a visual effect heavy project, you might want to create an entire board just for your visual effects shots rather than a list.
CREATING YOUR ‘STRUCTURE MAP’
Your Main Board is for collecting and organizing all of your project information, but your STRUCTURE MAP is where you write (and rewrite…and then rewrite again) your story.
Pictured above is the STRUCTURE MAP for Empire Episode 103
A structure map is going to be organized differently depending on whether you work in scripted, unscripted, or documentary. But the concept is the same: Each card represents an individual scene. If you are working specifically in documentary, you might use cards to represent story ideas or themes in addition to full scenes since often you are crafting your scenes from scratch in the edit.
Here is the information we include inside each individual scene card:
- We attach all scene-specific paperwork (lined script, “facing pages,” etc)
- We collect all raw dailies notes
- We input any script supervisor notes or warnings
- We assign a shooting date so we can track when a scene will be shot (Visit my 5 favorite features below to see how we turn these dates into a Trello calendar)
Once the map is complete, you can label all of your cards with different colors based on your story themes, character arcs, or whatever makes sense for you.
TRACKING YOUR PROGRESS
In addition to using a structure map similarly to how you would use a wall of index cards to track your story, you can also use it as a way to track your editorial progress through your first cut using colored labels.
It is not uncommon as an editor to constantly feel overwhelmed by the mountains of material you must sift through in order to craft a finished product. But if you can easily narrow down your tasks only to what you should be focused on any given day, you can eliminate a large amount of the overwhelm (and the procrastination this overwhelm leads to) by organizing your structure map according to your progress. (overwhelm is a noun?)
As human beings, we crave the completion of a task. This is partly because the brain wants to release the information it stores, but it cannot do so until a task is complete. This is why, for example, a waiter can remember 10 people’s orders, but as soon as the food is delivered he can’t recall that information later. This is called The Zeigarnik Effect.
After we construct a structure map for any given episode, before assigning colors based on story themes or characters, I will first assign colors based on my progress through the first cut. One of the fantastic features of Trello is the ability to filter cards by color, so for example if all the scenes I need to cut are labeled PURPLE, I can filter out all of the other cards that aren’t labeled purple and instantly have a very simple daily to-do list in front of me. My brain craves this completion, and I can avoid procrastination and overwhelm by immediately jumping into only the scenes that require my attention.
ORGANIZING A HIGH VOLUME OF VIDEOS
If you’ve read this far and said, “None of this really applies to my workflow because I deliver TONS of videos on a regular basis,” I have good new for you…there’s a Trello workflow for that too!
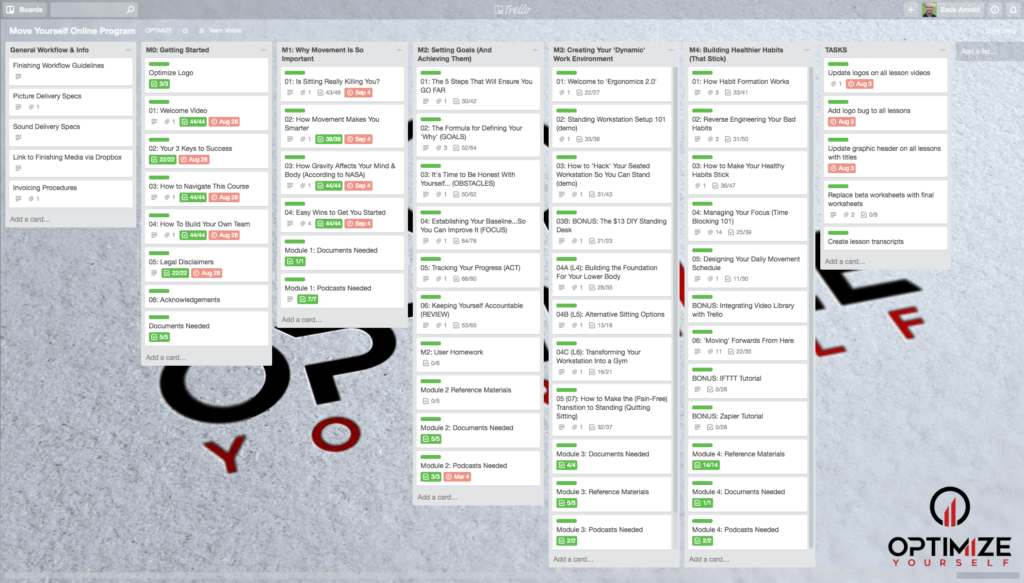
Pictured above is the MAIN BOARD for the ‘Move Yourself’ program
When I was creating the Move Yourself program, I used Trello to track and organize every single lesson and activity video (of which there are over 125 total) on just two boards. The difference between a scripted workflow and working with a high volume of videos is that instead of tracking your delivery schedules in one list, you track the delivery of each individual video in its specific card.
For each individual card you would:
- Attach the members working on that specific video (e.g. editors, producers)
- Attach all necessary paperwork for that specific video
- Include all corresponding workflow checklists for that video
- Include all necessary due dates and benchmarks for that video
My suggestion would be to create a template card that contains all of the repeatable information, then build your entire workflow from that template so you don’t have to recreate all of your various checklists.
By tracking all of your individual videos in cards, you can eliminate the hundreds of email chains necessary to track all of those notes, revisions, and deliverables. This not only saves you TONS of wasted time, it also helps eliminate errors along the way due to miscommunication.
MY 5 FAVORITE TRELLO FEATURES
If you can’t tell already, I love nearly everything about Trello (except maybe their mobile app). But if I had to distill everything I love about it and why I have transitioned my entire workflow to this one app, here are my absolute 5 favorite features:
- The ‘Calendar Power-Up.’
This allows me to create visual calendars based on the due dates I assign to individual cards. These calendars can then be linked to both Google and Apple Calendar as well.
- Filtering.
When you have over 100 scene cards or videos on a single board, the ability to be able to filter by member or color at the single click of a hot key is a gigantic time saver.
- Copying into checklists and cards.
This was the clincher for me. If you have an email with 25 pages of single-spaced notes (which I’ve received before), all you have to do is copy the entire email, paste into one checklist, and it will auto fill each item with its own individual checkmark. GAME. CHANGER. (You can do the same to create multiple cards on the fly as well)
- Creating custom fields.
This brand new power up enables you to have multiple due dates on a single card or create any custom field you want based on your individual workflow needs.
- Copying/Duplicating boards and cards.
Perhaps the most powerful thing about Trello is that after you do the work once, you can just duplicate it from there forwards. Whether it’s workflow checklists in a single card or your entire board structure, with a single click you can duplicate your work and start from there on your next project.
THE ‘WHY’ BEHIND USING TRELLO
So far I’ve walked you through the WHAT and the HOW, but this wouldn’t be a proper conclusion without also mentioning the WHY.
Since transitioning to a 100% digital, paperless, and email-less workflow I have been able to get infinitely more done in less time. I finish my cuts faster, I spend way less mental energy trying to remember repetitive tasks (e.g. “What are my output delivery specs again?”), and I am able to have more time and mental energy to be creative and do the best job possible.
But most importantly, thanks to my Trello workflow I now leave work earlier which allows me to read a bedtime story to my kids almost every single night rather than kissing them on the heads at 10pm after another late night at the office.
As a reminder, to learn every single step of this workflow in detail, check out my brand new course at Lynda.com:

